Ship
This activity allows the user to ship items from a warehouse. Shipments can be recorded against the following outbound activities:
- Sales Orders
- Purchase Return Orders
- Outbound Transfer Orders
In addition to being available for selection in the Action menu on the home screen, the Ship activity can be launched in the following ways:
- With the home screen open, pressing the F4 button on the handheld device.
- Entering or scanning a fully-picked warehouse shipment or released outbound document (sales, purchase return, or outbound transfer order) number in the quick scan area on the home screen. Note that the document must be fully picked; if picking activity is still required, entering a warehouse shipment or outbound document number will result in bcMobile opening the Pick activity.
- Clicking the Ship icon on the home screen:
Setup
The Ship activity can be configured for a particular mobile profile by entering SHIPMENT in the Page field on the Mobile Profile Setup page.
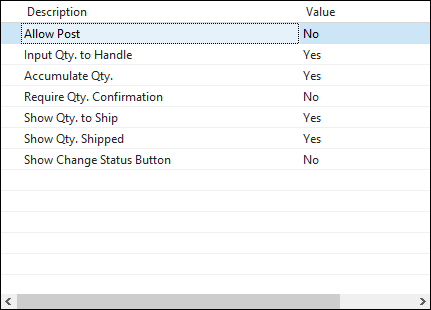
Fill in the fields as follows:
- Allow Post: Indicate whether mobile users will have the ability to post warehouse shipment documents directly from a handheld device. If this option is not enabled, posting must be recorded through the Business Central client.
- Input Qty. to Handle: Indicate whether mobile users will have the ability to enter the specific quantity of an item that will be handled as part of a shipment activity. For example, if we enabled this option and wished to record a shipment activity for 50 units of an item, we could enter a quantity to handle of 50 units. If this option is not enabled, the quantity to handle will always default to 1 unit of the item. This is useful when a company wishes to ensure that every unit of an item is recorded as part of the shipping process. Using our previous example, not enabling this option would result in a default quantity of 1 unit, requiring that each of the 50 units be recorded as part of the shipping activity.
- Accumulate Qty.: Indicate whether the recording of multiple shipment quantities against the same document line will be cumulative. If this option is enabled, a shipment quantity will continue to increase with each activity. For example, if we recorded a ship quantity of 2 units against a document line, then recorded a second shipment quantity of 3 units against the same line, the total quantity to ship would be 5 units. If this option is not enabled, the last recorded quantity will be interpreted as the quantity to ship. Using our previous scenario, recording first a quantity of 2 units and then a quantity of 3 units would result in a total quantity to ship of 3 units. Please note that when the setting in the Input Qty. to Handle field is set to No, it is recommended that this feature be enabled, since a direction to not accumulate entered quantities would result in the quantity to handle for all activities being set to 1 unit.
- Require Qty. Confirmation: When the setting in the Input Qty. to Handle field is set to No, the quantity to handle for an item being processed as part of a shipping activity will default to a value of 1 unit. If the require quantity confirmation option is enabled, mobile users must confirm this entry of 1 unit before it will be recorded as being shipped. If this option is not enabled, the shipping activity will be automatically recorded with the entry of the relevant item number. If the setting in the Input Qty. to Handle field is set to Yes, mobile users will always have the ability to enter the handled quantity, and the require quantity confirmation setting will be ignored.
- Show Qty. to Ship: Indicate whether you want the bcMobile page to include information about the outstanding quantity to ship for a shipment item. This information is copied directly from the corresponding document line in Business Central.
- Show Qty. Shipped: Indicate whether you want the bcMobile page to include information about the currently shipped quantity of a shipment item. This information is copied directly from the corresponding document line in Business Central.
- Show Change Status Button: Indicate whether you want the bcMobile page to include a Change Status button that will allow users to change the status of a warehouse shipment directly from a handheld device. If this option is not enabled, the document’s status must be changed through the Business Central client.
Business Central Activity
The warehouse shipments to which data will be recorded via bcMobile can be created from inbound documents within Business Central prior to mobile processing. Although it is not required, it may be useful to enter the ID for the mobile user who will process the shipping activity in the Assigned User ID field on General FastTab of the Warehouse Shipment page.
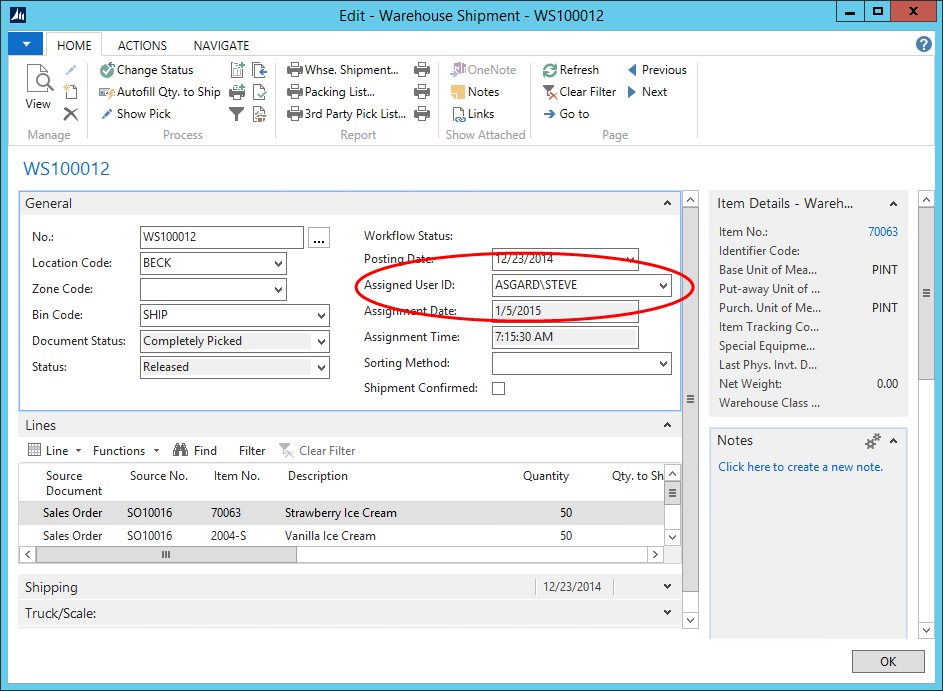
When a user launches the shipping activity in bcMobile, it is possible to view a list of only those shipping documents that have been assigned to the relevant user ID.
The status of a warehouse shipment must also be changed to Released in Business Central prior to processing in bcMobile.
bcMobile Activity
If the user opens the Ship activity by clicking the icon on the bcMobile home screen, the application will initially present a list of released warehouse shipments to which that user’s ID has been assigned.
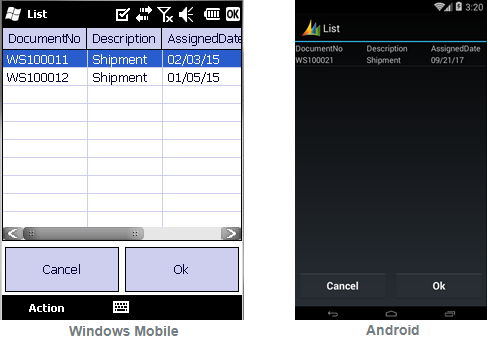
The user can select the desired document and click the OK button. The Ship page is opened with the relevant document assigned.
This list of user-assigned shipments is only displayed when the activity is launched through clicking the icon on the home screen. If the Ship activity is launched through the Action menu or via a quick scan, the application will immediately begin with the Ship page. If the entered warehouse shipment was not previously assigned to the user, its assigned user ID will be automatically updated by the program.
When a quick scan is performed for either a warehouse shipment or outbound document, the Ship page will launch only if the shipment has been completely picked. If picking activity still remains, bcMobile will bypass the Ship activity and open the Pick page instead.
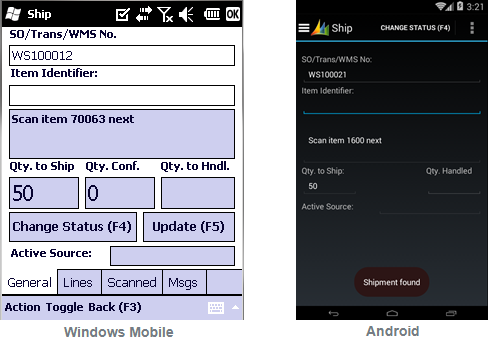
The user may change the currently-assigned warehouse shipment to a different shipment by manually entering or scanning the shipment number in the SO/Trans/WMS No. field, then clicking the Update (F5) button on the screen or physically pressing either the Enter or F5 button on the handheld device.
Additional information about the items that have been assigned to the currently-entered shipment can be obtained on the Lines tab.
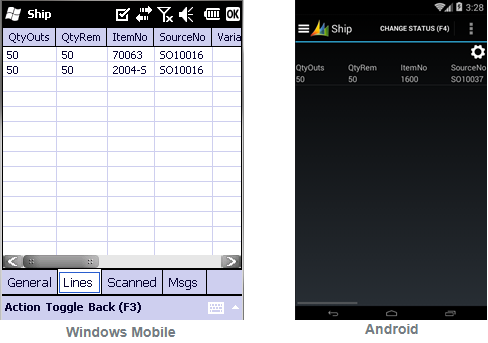
This screen presents the items that appear on the warehouse shipment. Information such as the quantity awaiting shipment and any recorded shipped quantities is included, as well.
Information about the individual activities that have been recorded for the shipment can be obtained on the Scanned tab.
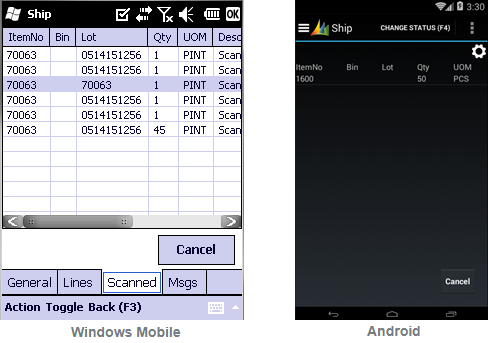
This screen presents each shipping activity that was recorded. In addition to basic information such as item number, lot number, and quantity, the date and time at which each entry was recorded is included.
To record shipping activity, complete the following steps:
- In the Identifier field, enter or scan the item number that will be shipped. The entered item must appear on one of the warehouse shipment’s lines with a remaining quantity to ship.
-
If the item is lot tracked, you must specify the lot number of the item that will be shipped in the Identifier field.
When the item number (and lot number, if applicable) is entered, information about the item is displayed in the area beneath the Identifier field.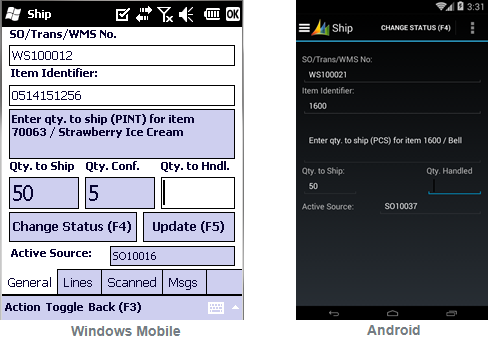
In addition, the Active Source field located towards the bottom of the page will present the source document for the warehouse shipment line being processed. This is useful when a single warehouse shipment exists for multiple outbound transactions, as it provides the user with visibility as to which outbound document he or she is recording data against. Finally, depending on how the activity has been set up, information about the item’s remaining quantity to ship and quantity already shipped may be displayed on the page.
-
In the Qty. to Hndl. field, enter the quantity of the item that will be shipped. The entered quantity cannot be greater than the outstanding quantity to ship on the warehouse shipment. The quantity to ship value will be updated accordingly.
It is possible to enter activity against the same item more than once. Depending on how the activity has been set up, each additional quantity you specify will be either absolute or cumulative. If the activity has been configured to treat entered quantities as absolute, the quantity to ship will always be updated with the latest quantity to handle. For example, if we entered a quantity to handle of 2 units, the quantity to ship would be set to 2 units. If we then entered a quantity to handle of 3 units, the quantity to ship would also update to 3 units. If entered quantities are cumulative, each subsequent quantity to handle will be added to the total. Using our previous scenario, entering a quantity to handle of 2 units would result in a quantity to ship of 2 units, but entering a quantity to handle of 3 units would update the quantity to ship to 5 units.
If it is necessary to reduce an entered quantity to ship for an absolute quantity, the user can simply enter the lesser quantity, and the information will update accordingly. In a cumulative scenario, however, the amount by which the reduction will be made must be entered. This activity can be performed in one of three ways:
- A negative value can be entered in the Qty. to Hndl. field.
-
Clicking the Toggle option at the bottom of the screen to switch the Qty. to Hndl. field to the Qty. to Undo field.
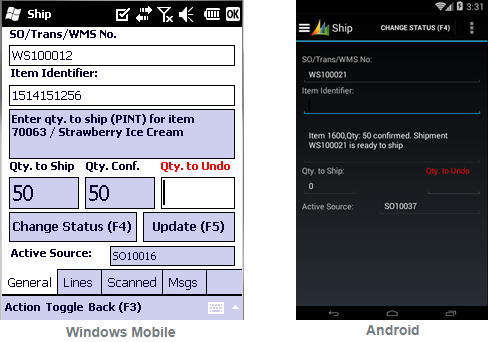
The amount by which the quantity will be reduced should be entered as a positive number. When using the toggle feature, it is important to switch the field back to Qty. to Hndl. before continuing to record additional shipping activity.
-
Opening the Scanned tab, selecting a line, and clicking the Cancel button. The application will ask if you want to cancel the scan entry.
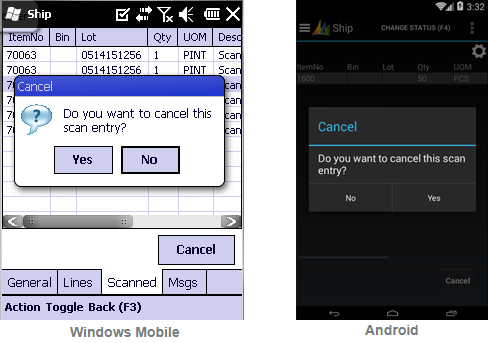
Answering Yes will delete the line and undo the shipping activity it represents.
- Repeat the previous steps to ship additional items. The bcMobile activity will maintain the currently-entered warehouse shipment, so that it is possible to specify additional items from the same document.
When you have finished specifying the items that you wish to ship, you can change the document’s status by clicking the Change Status (F4) button on the screen or physically pressing the F4 button on the handheld device. The warehouse shipment’s document will be updated from Released to Pending Approval. At this point, it will no longer be accessible from bcMobile. If it is necessary to enter additional data through a handheld device, a user will need to locate the document within Business Central and change its status back to Released.
Depending on how the activity has been set up, it may also be possible to post a warehouse shipment through the bcMobile application. If this feature has been enabled, a user may post the currently-entered warehouse shipment by clicking the Action option at the bottom of the screen and selecting the Post (F9) option or physically pressing the F9 button on the handheld device. The recorded scan data will be transferred to the Qty. to Ship field on the warehouse document within Business Central, and then posted.
Shipping License Plates/Truck Loading
If license plating is enabled in your bcMobile solution, it is possible to streamline the picking process by entering or scanning license plate records instead of items and lot numbers. These license plates can in turn be used in the mobile shipping process. When you are prompted to enter an item number for shipping, you can enter a license plate number, instead. The license plate you enter must have been picked against that shipment; entering a license plate that has not been picked against the shipment will result in an error. Information about the license plate's contents, including item number, lot number, and quantity, are automatically recorded.
If your bcMobile solution is deployed in conjunction with bcFood, this process can be used alongside bcFood's truck and loading dock assignment features to facilitate a complete truck loading process. Warehouse shipments can be assigned to specific delivery trucks and loading docks, and as license plates are loaded onto a given truck, this movement can be recorded in bcMobile.
Business Central Activity II
When a shipment quantity is recorded against a particular document line via bcMobile, the amount is not entered directly into the Qty. to Ship field. Instead, this data is maintained in a separate field called Scan Quantity.
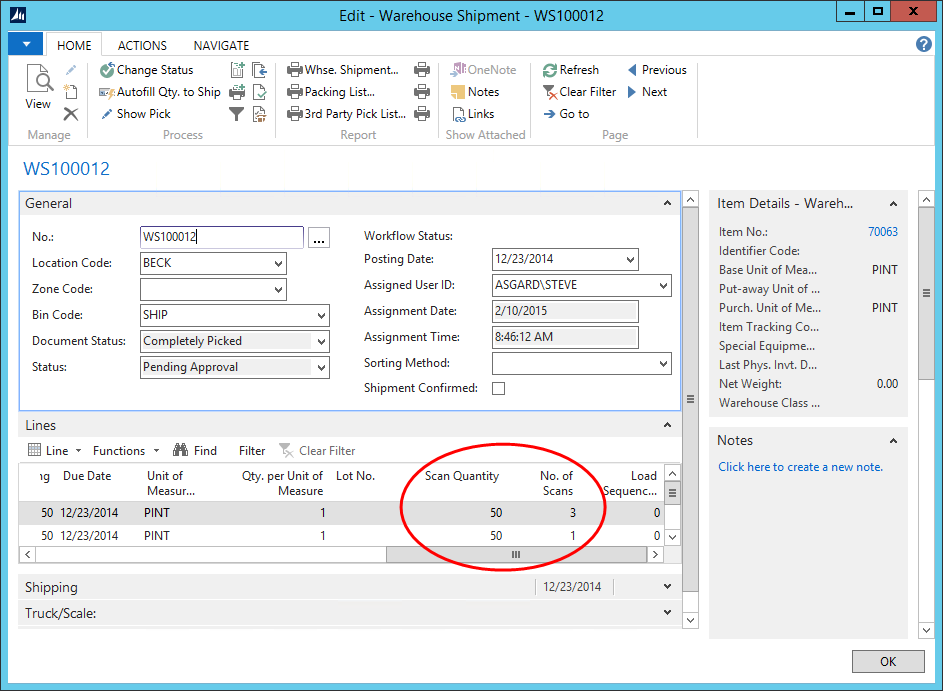
It is possible to configure the shipping activity to allow for the posting of recorded data via the bcMobile application. When a mobile user posts a warehouse shipment through the handheld device, the program will automatically update each line’s quantity to ship with its recorded scan quantity, then post the document. In such a scenario, it is not necessary to perform any additional processing within Business Central.
If this feature has not been enabled, however, a user must manually update the relevant fields before the warehouse shipment can be posted. This is achieved by opening the relevant shipment document, clicking the Actions tab and, in the Functions group, selecting the Transfer Scan Data option.

The values in the Scan Quantity field will be automatically copied to the Qty. to Ship field on each line. The document is now ready to be posted.